31 Dec 2012

Some hair science for you!


Effect of mineral oil, sunflower oil, and coconut oil on prevention of hair damage.

Rele AS, Mohile RB.
Source
Research and Development Department, Nature Care Division, Marico Industries Ltd., Mumbai, India.

Previously published results showed that both in vitro and in vivo coconut oil (CNO) treatments prevented combing damage of various hair types. Using the same methodology, an attempt was made to study the properties of mineral oil and sunflower oil on hair. Mineral oil (MO) was selected because it is extensively used in hair oil formulations in India, because it is non-greasy in nature, and because it is cheaper than vegetable oils like coconut and sunflower oils. The study was extended to sunflower oil (SFO) because it is the second most utilized base oil in the hair oil industry on account of its non-freezing property and its odorlessness at ambient temperature. As the aim was to cover different treatments, and the effect of these treatments on various hair types using the above oils, the number of experiments to be conducted was a very high number and a technique termed as the Taguchi Design of Experimentation was used. The findings clearly indicate the strong impact that coconut oil application has to hair as compared to application of both sunflower and mineral oils. Among three oils, coconut oil was the only oil found to reduce the protein loss remarkably for both undamaged and damaged hair when used as a pre-wash and post-wash grooming product. Both sunflower and mineral oils do not help at all in reducing the protein loss from hair. This difference in results could arise from the composition of each of these oils. Coconut oil, being a triglyceride of lauric acid (principal fatty acid), has a high affinity for hair proteins and, because of its low molecular weight and straight linear chain, is able to penetrate inside the hair shaft. Mineral oil, being a hydrocarbon, has no affinity for proteins and therefore is not able to penetrate and yield better results. In the case of sunflower oil, although it is a triglyceride of linoleic acid, because of its bulky structure due to the presence of double bonds, it does not penetrate the fiber, consequently resulting in no favorable impact on protein loss.


 I was researching whether sunflower oil was good for the hair and I stumbled upon this. Pretty interesting! It made me glad that coconut oil is my sealant.

17 Dec 2012

Book to buy: The Science of Black Hair *IMPORTANT HAIR EDUCATION*

See, many of us have carried out various online researches ranging from blogs to vlogs and youtube channels etc. However, it is important to be able to have a nearby source of information that is portable. One that you can look for whenever you're in need of a quick reference or advice. Well, The Science of Black hair is a good one. I've read reviews and ofcourse, my Lisa told me about it and I really want to read it! I shall buy it one day! It is equipped with so much information that will be essential throughout your journey or if you are at the start of one or considering beginning one. I am excited! If you want to know the basics about healthy hair care, check out the links below!

Click here for the details on Amazon

I checked out the authors website! Some really useful basic information is on there which I shall read now:

New (permanent) Deep Conditioner! & last shopping

Okay see, you can always keep track of my current products in the Hair Duties Track List page. I have finally gathered all my hair products. I did my hopefully, last hair products shopping a couple of days ago with Lisa. I like to just have all my needs catered for in one go instead having to go back and forth. I know my staple products and they should last me for hopefully more than 6 months or a year. Before the start of my hair journey, I never had this many products but I am pleased to say I care.

I bought  a new deep conditioner, having paid a much closer attention to my old one by Elasta QP. The Soy Oyl DC contained petrolatum and lanolin oil. I had a constant battle with myself because I wanted to make a commitment to myself and my hair regarding these bad substances, however the cost of it made me consider just sticking to it. But you know what, I should respect my hair a lot more and care for, regardless of the cost or energy required. I want to make a good start. Indeed, one thing about this journey is you will learn and realise on the way and such should be embraced.

For some reason, the bottle in the picture looks smaller compared to the actual bottle. I bought this Professional bottle size for £6.45. I tried uploading my own but it wouldn't let me. This bottle is 1Litre. I bought it because it did not have any sulphates, lanolin oil, petrolatum etc. In fact, the second ingredient is soybean oil. The ingredient list is listed according to the percentage content. So as you read through the list from left to right, the percentage of that substance in the bottle is lower. The third ingredient is glycerin, then olive oil. This really impressed me and I bought it, after a long search around the shop for an affordable and healthy staple product. You would be surprised by the amount of hair products that contain harmful substances. You have to be determined to search specifically. It wasn't a problem for me because my love for my hair helps me with it. It wasn't so much a mission because I love hair product shopping! I will miss it for a while but right now I am comfortable having purchased everything now. This product should last me for  about a year, hopefully and I find I will be using DC often. It is both moisturising and a light protein which can be used after my egg protein treatment aswell.

I also bought:
- Biona Virgin Coconut Oil: this actually smells like real coconut! It makes want to eat it, yum! The coconut oil I was previously using did not smell like coconut oil at all, but I didn't think it matteed because it moisturised my hair and strengthened it. However, thanks to Lisa (omg, get yourself a natural hair buddy!) she enlightened me and showed me where to buy this one she bought. It was about £5 but so worth it! She's used hers for about 6 months now and she's only half way. A little a day goes a long way.
- Applicator bottle: I will be mixing my oils in here for my hot oil treatment to make it easier for me to apply it to my scalp.
- Tiny spritz bottle: use during braids, to spray oil on my scalp
- Another spray bottle: one for my water and rose water mix and the other (older one) for anything like conditioner/shapoo mix for my braids


Washed and moisturised my braids!


I decided to wash my braids (scalp) week 1 into my protective styling. I am planning to keep it in for 4 weeks and I will be washing it in the 3rd week before taking them out. I mixed about 2 table spoons (measure) of Elasta QP shampoo with the same amount from my new ORS conditioner, into my spray bottle. I shaked the spray bottle until it formed into foams and sprayed on my scalp. I sprayed thoroughly around my scalp whilst massaging it in. After it was soaking I rinsed out the bottle and filled it in with water. I sprayed on my scalp and rinsed it out. I used a towel to gently absorb the water. I did this at night time so I sprayed my leave-in conditioner and wrapped up in a satin scarf to ensure quick drying. I woke up this morning and moisturised as usual. Sprayed my S-Curl moisturiser and sealed my scalp and rubbed some oil on my hair length.

I can say my hair feels very moisturised and cleansed!

14 Dec 2012

Change of protein treatment! Home made conditioner!

Lisa also stressed to me the need to get proper trimming scissors. Well, I made a huge mistake by using paper scissors because apparently, they aren't sharp enough and may therefore worsen the split ends. So yeah! I need to get proper sharp, trimming scissors!


I have finally been brought on into using egg as a protein treatment! I want to be as natural as possible so I won't be using Aphogee or ORS Hair mayonnaise, but instead, I want to stick to the natural properties as possible and stay away from too many chemicals. As usual, I shall be doing a protein treatment once a month after my usual hot oils/wash times (see hair duties track list). It is key to maintain a good moisture/protein balance according to your hair needs. I love protein, and since your hair is made up of protein (keratin), it won't do any harm at all, in fact, it is higly beneficial! Hitherto, I had been using greek yoghurt as my main protein treatment but I realised it was too costly for me every month so I am going to stop. Also, I used raw avocado mash which cost me a lot so instead I will buy avocado oil. Another reason for using egg is because there is nothing better than making use of in-your-kitchen or in-your-cupboard stuff, easy, accessible and cheap! Especially, if you're a busy woman. Egg is a great source of protein! Make sure you wear an old shirt before doing this, it could get messy. My treatment will follow:

Egg-yolk hair repair treatment
  • Crack open one egg
  • Mix in my mixer cup while pouring in one tablespoon of olive oil
  • Rub and massage around hair
  • Cover hair with shower cap
  • Leave for an hour
  • Rinse out with lukewarm/cold water and cheap conditioner (you do not want to cook the egg)
you can add:
yoghurt/mayo

Your hair should feel really strong afterwards! I have no complaints having used greek yoghurt because it made my hair feel really strong afterwards. Depending on your hair needs, you can use 1 or 2 eggs. Raw eggs contain a significant concentration of essential proteins and other nutrients. As a matter of fact, one egg contains 6 grams of high-quality protein and all 9 essential amino acids. Additionally, eggs  contain naturally occurring vitamin D.


pt1.
pt2.

There are only so many products you can use on your hair

I mean, I have been watching many videos of products used by girls with long hair. It made me realise, not every product will suit every hair so its best just to choose a certain or set of hair products, try, change and adjust. Keep your product list to the minimum, as well as the ingredient list. There are sooo many hair care products, but if you do your research well, you will have a good eye for the right ones. Ofcourse, regardless of research, your hair needs have to be taken into consideration as well. Balancing the two is crucial and knowing how much is too much is essential. As you can see, I have used many products, learned from my research and from my personal journey and have in return, made the appropriate changes.

What I really want to set out during my hair journey is being able to remain minimal, with little hassle or expense and still being able to grow long health hair.

Lessons.

13 Dec 2012

Get to know about Rose Water!

This beautiful scenting liquid was given and recommended to me by Lisa! I never knew about this, prior to our conversation while she was braiding my hair.
As you know, when you moisturise your hair daily, and you feel like your hair is extra dry or extra thirsty, you can spray water around your hair to quench that thirst. Nevertheless, you could just moisturise your hair with water every day and night before you sleep. Water is healthy! Then you can moisturise before or after and then seal. Well, you can also mix your water spray with rose water or just use rose water as your sole spray.

Currently with my single braids as protective styling, I spray on my scalp with rose water every day (mixture with water for braids), then every other day I moisturise using my massaging fingers using my mango and olive moisturiser and then seal with castor oil! I also use coconut oil to rub my braids until where my hair ends. There are so many benefits of rose water, apart from it being a very cheap hair product, it is highly beneficial and helps to give your hair a nice scent daily. When I take out my braids, I will be using it to moisturise my new growth to make them more manageable. A picture of my rose water bottle:


Benefits of rose water:

1. It has exceptional blood flow stimulating properties and therefore, it can be used as a home remedy for treating hair loss and increasing hair growth.
2. It is a natural moisturiser that helps to recover the quality of your hair.
3. Pure rose water, purchased by you from any reputed shop, is made up of rose oil and distilled water. Alternately, it can be prepared by soaking fresh rose petals in purified water. Hence, there are no artificial components and this natural product does not have any side effects (except an individual sensitivity to roses that might be likely).
4. On account of its innate healing properties, it is useful in treating mild scalp inflammations.
5. It has been found to be effective in treating dandruff that is caused mainly by fungal infections.
6. It is known to make the hair strands stronger and thus, it helps to minimize hair fall.
7. It imparts a delicate and lingering fragrance to your hair, thus giving you a refreshing feeling.

Incorporating rose water into your regimen:

• Rose water can be applied directly on your scalp and hair. Just take a few drops of rosewater and it should be rubbed into your scalp in a gentle manner. This will make your hair look fresh and the quality of your hair would be improved.
• Your regular shampoo can be diluted with rose water while you wash your hair.
• Use a cup of rose water as an after-shampoo-rinse to get deeply conditioned hair.
• Glycerin and rose water should be mixed in equal quantities and the mixture has to be applied on your scalp. Massage your scalp gently with the help of your finger tips. Let it remain on your scalp for around thirty minutes and shampoo your hair. This can be done once in every week for five or six months to get nourished hair and scalp.
• Home made shampoo with rosewater: To make the shampoo, you would require rose water (1/4 cup), rum (1/4 cup), three eggs and vinegar. This natural shampoo is extremely good for oily hair. First of all, the eggs have to be beaten thoroughly in a large bowl. Add rose water and rum in the quantities mentioned. Massage the mixture into your hair and scalp; start with your scalp area and work your way down to the hair-ends. If your hair tends to be extremely oily, leaving this shampoo for a couple of minutes will be beneficial. Rinse it in vinegar as this will strip the excess oils and restore natural sheen to your hair.

Best Homemade Moisturizing Spritiz, This is a must have for dry hair!!!!!

Aloe & Rosewater Moisture Hair Spray

More videos:


6-FOOT-LONG-HAIR: Natural Ways to Color Hair

6-FOOT-LONG-HAIR: Natural Ways to Color Hair: I posted this back in 2010, but added some more mixes and decided to re-post. Many of you are familiar with these, but I posted for those t...

Moisturising/Washing your protective style!


7 Dec 2012

Single Braids Tips! #3


If your hair has been recently chemically processed, avoid putting in braid/weave/cornrow extensions for a least a month. By then you will have some new growth to fortify the chemically treated hair, which is by nature weaker and porous, stronger more resilient hair for braid/weave/cornrow extension to be attached to.

 Make sure your hair is in good condition before embarking on putting on braid/weave/cornrow extensions. If hair is weak, brittle, breaking and experiencing excessive shedding, the braid/weave/cornrow extensions will only exacerbate the situation. We tend to see braid/weave/cornrow extensions as a way of masking or covering hair issues, so we look presentable till the issue is resolved. This is not the case, the weight and mechanical tension of the braids will only put more traumas on the hair. If there is a hair condition that is too bad to have out in public, it is better to try wigs as these can be removed every evening and the hair treated with whatever is needed, and also there is not pressure or tension applied to the hair to wear a the wig. DO NOT use glue on wigs though!


Do not apply braid/weave/cornrow extensions that are too heavy for your hair, the rule of thumb should be that the hair to be applied should be about the same amount in thickness as the hair it is to be attached to, that is to say if you section out a pencil sized amount of your hair, then your will attach hair of a pencil size in thickness to it. Also try to make the length of the extension no more than two and a half times the length of your own hair. If you want to make the length longer, then the thickness of the attached hair should be less than the thickness of the section of hair you want to attach it to, (but keep in mind though that if your hair is naturally curly or kinky and in its natural curly or kinky state, this will start to look untidy after your first wash). The reason for being careful of the size and length of the hair you attach to your hair is rather simple; you do not want to put undue strain on your hair and hair follicles, by adding too much weight for the hair to bear. This will lead to breakage, shedding and Alopecia.

Do not make the braid/weave/cornrow too tight. You do not want to sacrifice the health of your hair for style. If the braid/weave/cornrow extensions are too tight, you could end up with tension alopecia. Trichologists claim that when this type of alopecia happens to the edges and nape it is possible with perseverance to grow the hair back, but if it happens in the centre of your head this hair will never grow back. Make sure you insist to your stylist that you do not want the braids too tight.

Before braiding prepare the hair for the application of the extensions. Fortify, strengthen and build up your strands with a deep conditioning protein treatment (leave on hair for at least 20 – 30 minutes under a steamer or heat cap, or an hour if using a shower cap, towel and body heat). Follow this with a deeply moisturising conditioner, (again leave on for the prescribed times mentioned for the protein deep conditioning), one that compromises of Shea Butter and Coconut, is a good one to go with. Shea Butter for its moisturising properties and ability to seal in moisture, and Coconut Oil for its ability to moisturise hair strands and transport protein into the hair shaft.

When wearing your braids, wash your hair regularly, alternating between a light silicone free conditioner – co washing one week, and a sulphate free shampoo wash the next. This will prevent build up that can cause the hair to matt which will lead to tangles and hair breakage when you take out your braids. The best way to do this is to dilute the shampoo with water about 2 parts shampoo to one part water and put it in an applicator bottle. Wet hair thoroughly and apply the diluted shampoo to your scalp, use your finger pads to massage in gently and work into a lather, then rinse. During the rinsing the soapy water will work its way down the length of the braid and carry any dirt and oil with it.

Deep condition your hair after every shampoo wash to replace oils removed. You can use a shorter lighter conditioner treatment for after a co wash.

Seal in moisture after conditioning with a good water based moisturiser (this is moisturiser that has water as its first or one of its main ingredients).

Wrap hair in a turban with a micro fibre towel or cotton tee shirt, then when hair is no longer dripping allow it to air dry.

Oil your scalp once a week after every wash to prevent dry scalp and flakes forming. You don’t want dandruff whispering your secrets everywhere you go!

Moisturise your hair daily by misting with water, or an oil and water mix. Make sure you mist the roots as well as the entire length of your own hair with in the braid/weave/cornrow extension.

Apply a heavy moisturising butter like a Shea Butter and Coconut mix every other day after misting.

Do not carry your braids for too long, as tempting as it may be, especially when you think of the time and money spent to do them! The longer your leave the braids in the more likely you will get build-up and matting of your hair of some sort which will lead to hair loss and breakage ultimately.

When you take out your braids, remember to repeat the protein treatment, then moisturising treatment previously mentioned.

- curly2kinky

Single Braids Tips! #2


People tend to think that the moment they put braids extensions in  their hair . It will automatically grow
their hair and they don't have to do any thing else.  Truth is,  this is the best time to take care of your hair
naturally and still  wear extensions. It's pointless to wear braids for 3 months only to realize that the
situation and condition of your hair is  more or less the same if not worst, especially if the motive for
braiding is to improve the  overall well being of your hair and to take a break from all forms of hair
chemicals. I suggest the following steps to a healthy  braids wearing  and  to achieve
happiness/satisfaction  once the braids are out.

1: Chemicals - Avoid applying Individual extensions/braids in your hair at least until after 2 weeks of an chemical input. Sometimes braiders will tell you that relaxing your hair just before braiding will make your braids neater and more presentable. Truth is the neatness of your braids depends on how good the
braider is at parting the hair and more often than not, the length of your own hair. Very short hair tend to
come out of braids whilst longer hair stay put.

2 :  Before braiding - Deep condition your hair  a day before  applying the extensions. Continue to deep
condition your hair even when you have the braids  in  at least once in 2 weeks .  I suggest you use a
conditioner that is rich in protein. Use  an equal proportion of shea butter and coconut oil as deep
conditioner. (I have these products available too). If your hair is strong, though/hard I suggest you stick to
the same regimen as mine. I have vowed never to do without these two ingredients in my beauty regimen
and that includes my body/skin I am  staying strictly to shea butter because of it's moisturizing properties.
 Deep condition your hair for about 1 hour ( i normally stay longer, I deep condition when I have no where
to go so there's no hurry). Concentrates more on the root/scalp of the braids than the body it self.  Always
remember that if the foundation is weak the building will collapse .

3: Washing/shampooing - Wash your braids once in 2 weeks. This is very good for your hair as it allows
your hair to rest from the chemical contents in shampoos even though some shampoo products say they
have little chemical contents, my advice is,  it's better to be safe than sorry. Washing your braids every
two weeks will allow the braids to retain it's strength and  reduce early rough appearance. I must say that
braids is one of the very few hair styles that even when it's rough it's still beautiful. Buy a cheap old
shampoo if you must as braid extensions gulp lots of it before it lathers.

4: Coconut oil usage as hair nutrient dates back as far as the beginning of the black race in Ile-ife( the
origin of black nation). Coconut oil helps softens  yet strengthen and promotes your under growth. It also
promotes hair growth. Coconut oil  is  as strong and solid as coconut itself. An African proverb goes thus
"  Any one who breaks a coconut with his/her head will not be among the people that will eat it " That
adage is to show the extent of the power of coconut, so imaging something as strong as that fighting for
the benefit of your hair. The result is total success.

Another great ingredient to have at hand during your braiding period is unrefined Shea Butter ( Coconut
oil and shea butter are now available on our African Body Products page). This is the master of moisture
and healthy groom. There are many fake shea butter out there, please beware. Never use refined shea
butter, it's been chemically process. The Original Shea butter is cream in color and as often as many
beauticians try to tell people that shea butter can come in many shades. It doesn't. I spent 27 yrs in West
Africa and shea butter is a must have house old item over there. I grew up with shea butter and the color
has never been  other than cream . The color is Cream. The smell cannot be explained, it's close to
being odorless, yet it's not. It's not offensive at all. shea butter is all purpose moisturizer. Your skin will
thank you and your hair will rejoice.  If you don't have coconut oil or shea butter use braid sprays such as
African pride instead but get your hands on one of the ingredients above as soon as you can.  Always oil
your scalp at least 3 times a week to retain moisture and prevent flaky scalps or dandruffs.

- hadjabraids

Single Braid Tips! #1


While your hair is Braided

Be sure to Moisturize:
When hair is in braids, it often loses its moisture, making it easier to fall out. To help seal in moisture, remember to spritz hair with store bought braid sprays or a concoction of you own.
- You can create your own mixture by mixing oils like Jojoba, Olive, with water and glycerin.

Pay attention to braid BUILD-UP and NEW Growth
This usually happens when you have used too much product and your hair knots up at the roots after the emergence of new growth. At the site of build-up, simply take out old braids and re-braid, doing so often ensures your braid is always looking fresh

Remember to Wash
Just because your hair is in braids does not mean you should stop washing it. One easy way to wash your hair and maintain the style is to wash it with diluted shampoo while in the shower. Massage your scalp to release the debris, move along to the rest of your hair, and be careful not to tug on your hair too much. Don’t forget to condition your hair after washing, this can be achieved with the help of a leave-in conditioner.
Be sure to wash your braids once in two weeks, pay particular attention to the scalp.

Cover your braids before you sleep:
Whether it is a hair net or silk scarf, it is important to protect your braids from loosening while you sleep by covering it.

- bellanaija

Protective Styling: braids !

Guys, the braids I did last time were awesome, for me, and for my hair! I want them again. I am going to need a really good protective styling for the winter ''winterising my hair'' and for the holidays too! Keeping my hair protected is key and braids make me feel more natural. No more weave. I tell everyone. I shall be doing black and some wine red braids, since I did brown highlights last time. Let's see how it goes :D I am going to search up ways to keep my hair in good condition while in braids. I don't want to buy braids  sprays, products etc. from the shop but I would rather make my own braids hair care treatments. Braids will help me retain length and growth. One thing I would never do though, is do micro-braids (too much risk!), I will be doing thick braids, about the same thickness as my hair.

I just did my hot oil treatment and conditioned my hair so that it will be in good shape before the braiding.

Lisa will be doing my single braids for me today before we head up to my uni christmas party!

4 Dec 2012

My lovely girl!


This is my lovely girl Lisa! I love her so much! She's the first person I met to have been on a natural hair journey, completed dedicated and excited for it! We work at the same place and we ended up recognising that we are both on a journey. She's currently on her 8th month and her hair is amazing! It feels good to know you have someone that you can share your hair experiences with, ask questions, hair shop together and share advice with! It makes it even more exciting because she is natural while I am relaxed, kind of like a fitting puzzle. We text each other everytime regarding our hair stuff and she's the first to notice my growth!

Back to using shea butter! She helped me with my solidcold shea butter by placing it on the heater. Remember my past shea butter post? Well, I whipped up a shea butter cream, however it had kinda flopped because it was solid. I attempted to rub it on my hair (in its solid form) and my hair cut off. So I completely stopped it and put it aside! But, where would I be without my Lisa? She told me I just needed to rub it between my hands until it transformed into a oily substance before rubbing it into my hair. Thank you lisa! :D I rubbed the shea butter in my hair and it felt really good. She sold form had been in a cup for many weeks now, but I finally made use of it tonight. I shall be using it as my pre-sleep moisturiser before wrapping silk.

My natural hair buddy <3 FOLLOW HER TUMBLR

3 Dec 2012

Megz Roller setting!


I love megz's hair! :D


Shopping! New replacement products!

I went to do some hair care products shopping today. I bought:
- Elasta QP Olive Oil and Mango Butter moisturiser
- Elasta QP  Soy Oyl Anti-Breakage Moisture-Rich Deep Conditioner

I love Elasta QP products, not only due to their minimum ingredient list and avoidance of harsh substances (see tips) but because of the effects of their products on my hair. This moisturiser has a watery, non-greasy/oily substance which is really good. Many moisturisers I saw on the shelves were oily and sticky in substance, and we know what that does. We are trying to avoid petrolatum, petroleum oil, lanolin etc. I will stop using Luster's pink because it contains those (I read the ingredients list again, however my reasons for using it had been due to my friends and families using the cream, they had good hair!) and it's better to cut it out earlier than later. Henceforth, I will be using my 2 moisturisers, this one and Luster's S-curl (highly recommended, non-greasy!). I'm keeping my regime and products to a minimum. As usual, my sealing cream will be coconut oil, real, actual coconut oil. It has to smell like coconut, although much more expensive.

I cannot believe the way I used to treat my hair prior to this journey. I would use Dax on my hair. I feel like I should ask my hair for forgiveness. Dax is like 99% petroleum, I might aswell had used vaseline on my hair. Yes, they state jojoba oil etc on the ingredient list but I bet it's only 0.000002% of that. Never again. Also, I would leave the relaxer for more than 15 mins on my hair. You want to know how long for? 1-2 hours! Yes, I know, I know. But now I have realised and I am treating my hair like a baby. I love my hair so much, to the extent where the thought of putting weave back on my head again makes me itch.

Now left to buy:
- Organic ACV
- Biona Organic virgin coconut oil (smells like coconut soo much, I could eat it!) around £7.
After I get those, my product list will be completed! :D

1 Dec 2012

Comments!

I am very happy! I have been receiving various compliments regarding my hair. My friends and my aunts have noticed my hair growth, thickness and improvement. It's good to know people take regard and it makes me want to be even more determined! I shall reach my length!

Pic: Curls!!


24 Nov 2012

Progress change

Every little counts. 3 months. Four progress pictures per 12 months will be posted. Look at where my shoulder curves to compare. I tried my best to make the pictures symmetrical. I have now found a standard position and way to take my progress pictures (like the left) and I shall continue to take them in that way.

*mistake - the dates are the other way around

changes:
- fuller
- longer

To buy:

- ACV
- Avocado Oil to add to my protein treatment
- Cantu Leave-in Conditioner
- Elasta QP deep penetrating remoisturiser (after finishing my current one)

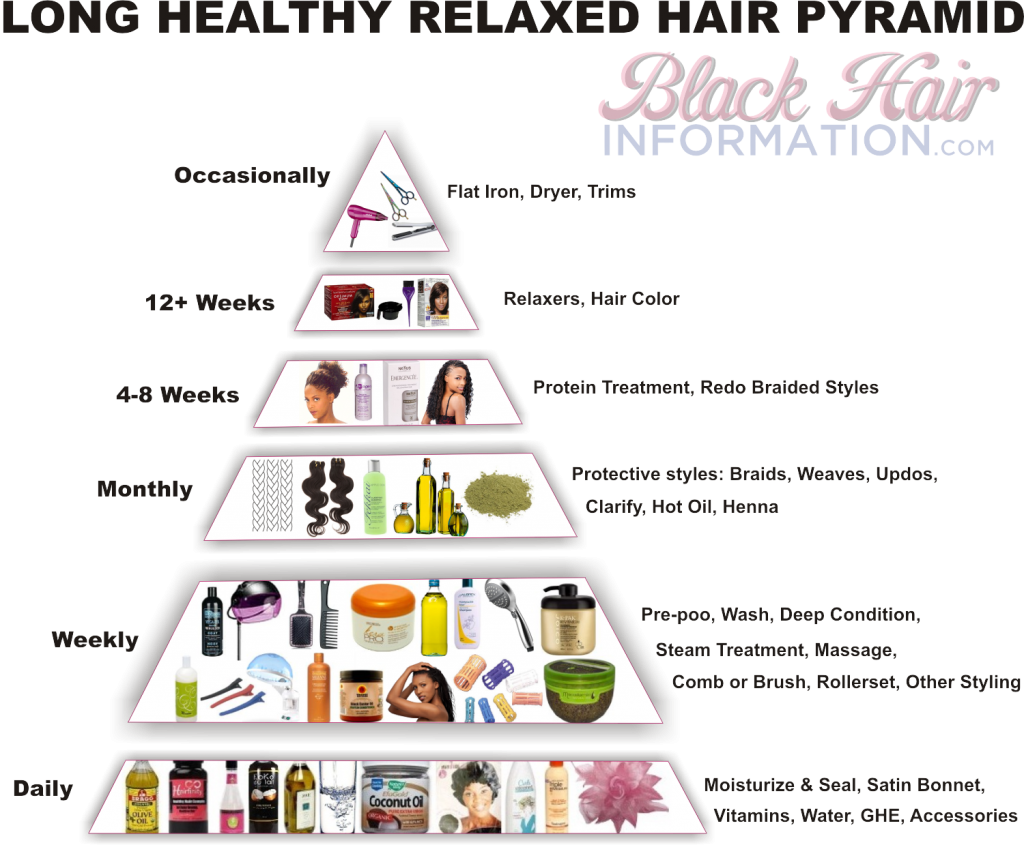
Long Healthy Relaxed Hair Pyramid – BlackHairInformation

Long Healthy Relaxed Hair Pyramid - A Regimen At A GlanceCourtesy Of BlackHairInformation.com

23 Nov 2012

New addition to my regimen: ACV

Hi guys, I am going to purchase Apple Cider Vinegar and I hope to be able to find a natural one. I have been reading about this solution here and there but until a friend of mine at uni mentioned it to me I didn't realise how beneficial it is to hair. I found a couple of articles.


Benefits:
Will not interfere with color.  Color safe.
Natural/Organic
Encourages healthy hair growth.
Prevents dandruff and scalp itch.
Kills fungus and bacteria & cleans dirty scalp.
Removes build up from hair and scalp.
Dissolves DHT residue.
Nutrients nourish follicles.
Unclogs follicles.


How To Use:

Once a month or bi-weekly to remove build up and to maintain your scalp & hair health. Pour 1/4 cup of apple cider vinegar added to 2 cups of water. Use it as a final shampoo rinse.

Apple Cider Wonders:
 It is the bomb for removing styling build up from the hair such as too much conditioner, hairspray build-up, etc. It really cleanses the hair and scalp without leaving it dried out. All natural with no harmful chemicals. The Organic Apple Cider Vinegar rinse clarifies and restores shine.  This sort of hair and scalp rinse is a ‘Natural Gal’s’ must have.  It is also a commodity for those with relaxed or over processed hair.     The best part about an Organic Apple Cider Vinegar rinse is the removal of buildup and the cleansing properties it provides.  There are those who also like to make their own Apple Cider scalp rinses.  With a blend of herbs and organic apple cider vinegar, this too can be done.  The Hair Champagne by hairbesilk.com is a truly amazing product.  It Softens hair without stripping and restores pH balance. Great as a post-chemical process treatment to seal in color or curls. Use weekly as a treatment to rid your hair of dulling buildup.

Chemical Free:
We are all given an equal chance.  Since we are born with healthy hair, we should and could maintain a head of healthy hair.   As children, we had beautiful, baby-soft, luxurious,  shiny hair.  Subjecting our hair to alcohol-based hair sprays, chemical relaxers, blow dryers, and styling irons all cause tremendous damage. But don’t give up hope.  Instead, next time you wash your hair, reach for an Organic Apple Cider Vinegar hair rinse. By nourishing it with natures own products; conditioners like that in which is contained in an Apple cider rinse, will your hair’s shine come to life.   Hair this healthy will be addictive!

Using Apple cider when heat styling
Apple cider vinegar rinse solution with cold water in a spray bottle, can be used while heat styling to help close up the hair cuticle and give a smooth shiny finish to hair. A cold-water solution with apple cider rinse can really help it giving your hair the finish you want after heat styling.

Using apple cider rinse to promote hair growth
Apple rinse is acidic, as we know, but so is the normal PH balance state of a healthy scalp. When you your scalp’s PH balance leans towards being alkaline it tends to breed Bactria and fungi is that inhibit, hair growth.

The regular use of Apple cider Vinegar rinses can help keep a normal PH balance with reduces the risk of hair loss due to fungi’s on the scalp.
The benefits of apple cider vinegar on black hair are many, and you can use this product on all hair types and textures as a solution to some of your hair problems.
A cheap and easy to use product that can be found at your local super market. What makes it a great ingredient is not only that you can use as much as you want in your solution of do it your self-hair treatments at home, you can also use as much as you want, as it is cheap as well.


I am going to purchase ACV, incorporate it after my hair rinsing, as a clarifying rinse every month, and I will keep track of how it goes!

21 Oct 2012

Update 21/10/2012

Hello guys!
I am so sorry I haven't posted anything in a long while. I have been absolutely busy and if I'm honest it has had an impact on the amount of time I have given towards caring for my hair. This is one of the responsibilities of natural hair, you have to make way and give time to take care of it. I have been consumed by many things, including university, work and trying to organise those things and my life. Sometimes I would find that I just don't have time to do hot oil treatments. It has been raining heavily for the past weeks and my hair has been a victim of acid rain

I haven't updated you on my hair post-braids. I took out my braids and my hair came out a lot thicker which I was very pleased about. Also, I have revised my regime and I should be reducing the relaxing time span from every 4 months to every 3 months. I have alot of undergrowth, even right now, as I am typing this up. I have exactly one month to go then, until I relax. And ofcourse, I shall be relaxing only the undergrowth (I used to relax my whole head before, I know, horrible :(...) and I might even consider getting it relaxed professionally at the hair dressers. I bond/tie my hair up a couple of days a week to avoid the ends friction with the clothes on the shoulder. I seal every day with jojoba/lavender oil.

So yeah. Right now, I just finished washing and conditioning my hair and I packed it up. It will be dry by the time I wake up tomorrow. I decided to do it this morning 1am rather than later today when I would be busy. I will make it. I will find my balance. My hair is always on my mind. I have noticed growth too! Can't wait to post up progress pictures after relaxing it!

7 Sept 2012

Changes to my regimen

As you go along your hair journey, you have to be prepared to make changes to your hair regimen.

Changes:
- coconut oil daily to seal
- olive oil and honey into conditioner mix
- weekly hot oil treatment instead of bi-weekly
- blow dry while conditioning (15 mins)

To buy:
Elasta QP products are very well recommended by my role models. Having analysed their ingredients lists, the shampoos do not contain sulphates and the list is pretty minimum compared to some other brands. I am put off by products with many, too many ingredients. Less is more.
- Elasta QP Creme Conditioning Shampoo
- Elasta QP rollers mouse
- (moisture conditioner)? Proclaim Aloe and Shea Butter Moisturizing Conditioner?
- Elasta QP Scalp Stimulating Shampoo: this will be used once a month to clarify as I am using a non-sulphate shampoo or use my current sulphate shampoo once a month (Don't want to waste it)
- QP Olive Oil and Mango Butter moisturiser

(Italics means I have purchased them)

Your regimen should aim to achieve a moisture/protein balance. I already do a protein treatment therefore I need a moisturising conditioner instead of a protein conditioner. At first I was thinking to purchase the two different types of conditioners but then I thought I could balance that out in other ways too. E.g creams, treatments, shampoos. Read more about it here.

6 Sept 2012

Protective styling: Braids.. one last time?


Okay so I've read a few hair blogs and I've heard the word of mouth that single braids help to grow and thicken hair, since you don't have to tamper your hair in its protective state. I have seen the positive results of some women's before and after pictures and I want to try mine. This is the second time I am doing proper single braids. I took a progress picture of my hair before this hairdo and then before I start uni I will take a picture of my hair after the braids. I will keep them in for about 3 weeks (before I start uni) to see the effects of them. I love them, and really long too. My cousin did them for me, she started while I continued to finish off the braids. Before and after the hair-do she rubbed in some indian hemp (full of many natural oils) and coconut oil, making sure my hair was very well moisturised.

 If I like the results, I may consider them in another like 3 months as some sort of treatment.

My hair length - 05/09/2012


Keeping my hair well-moisturised!

30 Aug 2012

Say hello to air drying!

I did a hot-oil treatment today and then I air-dried my hair! It felt good, no heat! I moisturised my hair, combed it back and let it air dry and after about 2 hours my hair was completely dry. I am definitely going to continue air drying my hair instead of blow drying it (unless I am in a hurry to go out). This strategy is often part of the regimens of the long-haired women's blog I follow. Minimum heat is key. I am going to buy a long silk scarf to cover my head and make the front smooth, although they pretty much are.

Watch the following video for a more in-depth explanation:
Bye bye blow-drying!

Making my own shea butter cream


I have realised how important it is to keep your hair moisturised. Before commencing this journey I did not like moisturising my hair because I was afraid it would get too 'dirty', not knowing the hair feeds on moisture. I am currently using Luster's Pink Oil as my daily moisturiser. I have had to ditch the Apple Hair Food and Indian Hemp cream because they contain Petroleum which isn't good for your hair. I want to add Shea Butter cream to my daily hair moisturiser/sealant, so I will have two products. I don't want to be using too many different moisturisers on my hair.

As I mentioned earlier, my mum returned from her holiday this morning and I broke the news to her. To my surprise she brought a can of solidified shea butter with her. This butter is good for the body and for the hair. If I wanted to explain the benefits of this cream, it would take all day. Winter is coming and I need a good protectant, so I will be going shopping with my mum to buy the extra ingredients to make this concoction. I have a spare plastic bottle ready to fill it up with. Instead of buying the Unrefined Shea Butter product from the shops (which I failed to find), I will just prepare my own daily moisturiser. I've got the solidified shea butter already.

What I will then do next:


Shea Butter Hair and Skin Homemade Recipe
- 1.5 cup of Shea Butter
- ½ Cup of coconut oil
- 1 tsp. Of Vitamin E Oil (preservative)
- ½ ounce of fragrance oil/lavender

Heat shea butter slowly in a medium sized saucepan until the butter is in liquid form. When it is liquid add in the coconut oil and mix/whip it around until both are incorporated and it becomes thicker. While it is still somewhat liquid, add the Vitamin E oil and the fragrance oil.

Whip the mixture again (for about 30 minutes). The consistency should resemble yogurt in smoothness. Add some fragrance oil. When you have reached the desired consistency you can spoon your finished product into a container. Use as often as needed as a daily skin and hair moisturizer. This is a very good replacement for commercial hair oils and skin lotions.

Shea butter has numerous benefits for hair and skin:


  • Shea butter provides moisture to dry and damaged hair from the roots to the tips, leaving it healthy and shiny. Because it's rich in vitamins A and E, shea butter soothes dryness, repairs breakage, and mends split ends.
  • Shea butter absorbs quickly and completely into the scalp without clogging pores, leaving a greasy residue, or causing a buildup of oil or dandruff.
  • Shea butter protects hair from weather damage caused by wind, humidity, and extreme dryness, and repairs such damage.
  • Because it's rich in moisture and can shield against harmful ultraviolet radiation, shea butter protects hair from sun damage.
  • If your hair has endured chemical treatments, hot irons, and blow-dryers, shea butter can restore its moisture and vitality.


More information #1
More Information #2

So I told my mum...

My mum came back from her holiday in Nigeria today. I broke the news to her about me going natural. She was sooo happy about it! I didn't know she would be this pleased. She told me how she had been praying for me to come to the realisation. I liked it because if she had told insisted on me going natural I probably would've brushed it off, I came to my own realisation. She did always prefer me leaving my natural hair out.
So I explained my whole journey to her, showed her the products I bought and just everything. She was really happy. I'm happy too. I have completely stopped the whole sowing weave into my hair using needles and threads, natural all the way.

Yay! My mum supports me all the way. This will make everything much easier!

To buy: Jamaican Black Castor Oil


I can't say much because I'm speechless, having been astounded by the countless amazing youtube and article reviews of this product. It has done wonders. I am not going to buy it until I've finished my normal castor oil that I bought a couple of days ago. JBCO is around £15 but it is its money's worth. I saw it at the hair shop when I went shopping for my hair care products but and its price put me off. I stumbled upon it yesterday and read the reviews. I still don't know how many people do don't know about this oil. It is different to the regular castor oil because of its ash content due to the roasting of the beans, having been manufactured the oil fashioned way in Jamica. Therefore, the more ash content, the more effective the oil. This is not a myth, it is evidence based on scientific facts. It has helped to thicken and grow hair at a fast rate. I can't wait to get mine!

29 Aug 2012

What's your goal?

What's your goal?

(click for a larger view)
I am currently touching the neck length.
My goal is between the armpit length and the bra-strap length. 

27 Aug 2012

Curly Natural Hair Styles (blackhair101.com)


Braid Out

There are two types of braid outs, ordinary three section plaits and cornrow plates. They both look good when done properly and are a hard hairstyle to mess up.

STEP 1- Wash Hair with natural shampoo. You can use whatever shampoo you want to but the adage on this site is ‘the less chemicals in shampoo the better’. Wash hair only once, see how to shampoo hair for further details.

STEP 2- Condition Hair- Don’t just use an ordinary run of the mill conditioner, use a deep conditioner. I use a select few deep conditioners based on my hair needs at the time (protein or moisture).

STEP 3- Go under the overhead dryer for fifteen minutes to deep condition or put hair in a shower cap and then allow your body heat to penetrate for two to three hours. I usually do this.

STEP 4- Rinse out deep conditioner and air dry hair.

STEP 5- Your hair should be soft and well moisturized. When hair is partially dry it should still feel silky. Apply your favorite oil to seal in this lovely moisture. I use castor oil for sealing. I usually use coconut oil for my weekly hot oil treatments.

STEP 6- Part hair in small or large sections and then cornrow it. The bigger the parts the bigger the waves the smaller the parts, the tinier the waves. To achieve the style above I did my hair in 10 parts.

Setter Waves


STEP 1- Wash hair with natural shampoo.

STEP 2- Condition Hair- deep condition with a moisture rich deep conditioner. For this style I used Organic Root Stimulator Hair Mayonnaise Treatment or natural treatment.

STEP 3- Rinse out hair after you have either used the over head dryer for fifteen minutes or allowed your body heat to steam hair.

STEP 4- Set hair with medium sized rollers (not the jumbo ones or the tiny ones) and allow to air dry or go under the dryer for 30 minutes and then air dry.

Crunched Style


If you really want volume, you can try the crunched look. This requires minimum fuss for me in the week and is so easy to do. This style was created on a previously done curly style.

STEP 1- Spray hair with a combo of water and oil (I used coconut oil) until slightly damp.

STEP 2- Part hair in six sections.

STEP3- Plait hair and leave to air dry.

Courtesy


Soon to post and buy...

  • Baggy treatment
  • My Hair regime
  • Tips page updated!
To buy:
  • Large rollers
  • Shea butter
Keep following!

Satin Hair Net and Peppermint Oil review


Hey guys, so during my bulk hair shopping activity I bought a satin hair net, called 'The String Triangle'. Satin materials are good for the hair as it reduces the possibility of breakage and locks in moisture. I have been using it for the past couple of days before I go into bed and use my laptop, not even sleep, thus my hair will be protected before I go into actual sleep. The effects on my hair have been very positive, when I wake up in the morning, I won't have messy sleep hair (like I would with my previous nets), but my hair would be so smooth. I usually tight tie my hair back in a protective style then tie on the material. My hair wakes up in place. Good stuff.

Peppermint Oil Review
Anything that tingles is good. That should be my motto. I use Clean and Clear daily washing facial cream when I shower and when I rub the cream onto my face, it gives me sort of pepperish, tingling sensation on my face. It doesn't hurt at all but I love the feeling. It leaves my face very smooth.  Peppermint oil contains numerous minerals and nutrients including magnesium, calcium, manganese, iron, folate, potassium, and copper. It also contains omega-3 fatty acids, Vitamin A and Vitamin C.
Peppermint oil has the same effect, but with hair what I find very vital is that it increases blood circulation on the scalp to help promote hair growth, especially for people suffering from hair loss. Some people don't grow much hair in some parts of their scalp. My hair grows slowly at the top corner of my scalp in front. Every night I would wrop one finger touch of oil onto the area and cover my hair with the satin. Well, today, being day #5 and I can say my hair growth is amazing. The hairs have just been sprouting out and I feel like with continuous use, within a month my hair growth at the front parts will be remarkable. I love peppermint oil. 

I want to try something as my dad grows peppermint leaves at the backyard. I could boil the leaves and use the water to rinse my hair the first time during the wash then just use normal water to wash it again. I will see how that goes. Natural all the way!!!

24 Aug 2012

Decrease relaxer usage

Hey guys,
So you know how this journey is also about making mistakes and learning from it or just simply making changes to routines. Well indeed. I have come to some realisation about using relaxers. I am going to decrease the use of relaxers to just twice a year. I like how the relaxers straighten my hair but I want to decrease using it to see how the effects on my hair would be otherwise, regardless of it being no-lye or not harsh.

--------------------------------------
Change - 27/08/2012
Okay, guys I'm editting this post. I spoke to my good friend Chi (who aswell is going natural) and she adviced me to completely stop the use of relaxers. After talking to her I realised and I remembered my previous picture post displayed the hair of big haired women. After I took out my last weave my hair was very thick (and as you all know, thick hair CAN be hard to tame), I relaxed it and although I maintained some thickness and got my hair to be straight, I felt guilty. It sounds crazy right? I know, but I felt like the relaxer was too much of an unnatural hair care for my hair. Yes, thick hair can be difficult but there's nothing wrong about that. You can look for other ways to make your hair straight and manageable instead of taking the chemical route. Forget it, even if it says ''soft on hair'' or No-lye, yes they are good benefits, but no, it is still full of chemicals that are harsh. Natural as best as possible, is the way.
I did a mayo treatment on my hair a few days ago and I was very pleased with the result. So yeah, this means I'm coming off relaxers for now, I want that thick hair. I'm happy with where my hair journey is taking me and with the lessons I am learning. Thanks to my friends and personal experiences - the true eye openers.

22 Aug 2012

Shopping for the journey!


(Click on the picture to enlarge it)
Okay, so today I did a huge hair shopping. See when you're busy doing weaves you don't really see the need to buy creams, oils and tools for your natural hair. But upon having started this journey, I realised there was the need to purchase hair care products, such need I have never experienced before. It felt weird. Yes, I had to adjust because my natural hair just achieved some level of importance in my life.
In the above picture, the oils and creams that I bought at my local hair shop are shown, the other stuff I bought will be explained too.

Stay On Satin Night Scarf - designed with a string that can be tied to lock in moister and prevent breakage at nighttime. Silk scarfs are the way forward.

Oils and creams:

  • Luster's Pink Original - Vitamin E revives damaged hair, Vitamin B5 protects and conditions hair, heat protection. Many of my friends that often use natural hair make use of this cream and the effects are very obvious. It's an amazing, silky smooth cream.
  • Indian Hemp (top) - I cannot stress how much this natural herbal cream blesses black hair. I have known its benefits as I also had a tiny container version. The ingredient label made me smile: coconut oil, sweet almond oil, rosemary oil, avocado oil, saflower oil, soy protein, Indian Hemp Herb etc. Packed up with so much goodness!
  • 100% Coconut Oil
  • 100% Jojoba Oil - this was expensive!!! I asked one of the shop assistants and he said the best ones are the most expensive ones. Fair enough.
  • 100% Pure Peppermint Oil
  • 100% West Indian Castor Oil
I decided these are the oils and creams that I will be making use of throughout my hair regime.

Sprays/Shampoo/Conditioner (not in the picture)

  • Bristows Extra Firm Hold - for my curls!
  • Elasta QP Hair Gel Organic Infusion + Olive Oil - for when I want to pack up my hair. Ingredients: water, coconut oil, olive oil, vitamin A, vitamin C, Avocado Oil (full of vitamins!)
  • Schwarzkopf Hair Repair Liquid Silk Shampoo - Repair Innovation with liquid Keratin (affordable!)
  • Herbal Essences Moisture Balancing Conditioner - Aloe Vera, Chamomile and Passion Flower
There were so many hair care products but I took my time to select the products that would do no harm to my hair and select out the good and natural ingredients. Some products had zero natural ingredients in them and all I kept reading was sulphate, petroleum this and that. There were many more good oils sold in the hair shops but I felt these ones were sufficient and had the best qualities. Although my bank account did not like this shopping, it will be a one off and I can keep consistency in my hair care. My hair must be happy right now.

Ps: I bought a spray bottle so I can mix in the oils and spray onto my hair sparingly when doing my treatments.


My current hair length


So these are pictures of my hair, after trimming (which I won't be doing for another 2 months as part of my regime), and as you can see, they are touching my shoulder lengths. 

Bye, Bye weave!


Okay so I just took out my last weave! No more weaves as from today. I wanted to get it out so quickly and to just feel the breeze flow through my hair. Its feels sooo good. I realised how horrible I've been treating my hair, sowing threads through it and just having to pick out the threads from my hair, which have inevitably caused breakage. 

Anyways, right now, I'm going to lightly comb my hair with a wide-toothed comb and relax it for 15 minutes maximum. After that I will airdry it at a low temperature, trim the ends, rub in some Indian Hemp cream and post up a picture of my current hair length. And so, my natural hair journey commences today. Wednesday, 22nd August 2012.

Video: 10 tips for growing strong healthy long hair

I really love her tips!


Tutorial Video: Relaxing Hair and Setting It

I watched this tutorial video and I love how she demonstrates the ease at which a girl can relax her hair and then style it after. I realised I needed to get me some big rollers as they give your hair more width. When her hair was dripped with water it looked very straight, but after the rollers, she managed to style her hair out very well. Shows how natural hair can be styled beautifully.  I noticed that she has my hair texture.


Relaxing my hair today...


This morning I woke up with this continuous itchy scalp under my weave. I was waiting till the end of the month to start my journey, so that it can grow under the tracks but it seems like I am just too excited to start and the weave is displeasing me. Today I will take off the weave and I will be relaxing the undergrowth of my hair. I haven't relaxed my hair in about 4/5 months and I plan to keep it that way, relaxing it just 3 times a year.

Again, I will stress the fact that there is nothing wrong about relaxers, as long as you ''look for the good ingredients'', know the texture of your hair and thereby know how to avoid the harsh/strong ones.
Now I stumbled upon these packets of Profective No-Lye relaxers today, my mum makes good choices. Until I made this decision to go natural, If I'm honest, I never really payed much attention to the labels, I was going to fix on a weave anyways. 

Benefits of Profective No-Lye Relaxer:
- Anti-damage and no-lye; lye relaxers come in around the 12-14 range, no-lye relaxers have a pH of 9-9.5. The lower PH makes it a milder type of chemical to expose a scalp to.
- Conditioning and moisturising
- Comes with BreakFree leave-in strengthening cream to stop chemical damage and breakage; this can be applied to hair before relaxing AND after relaxing to neutralise hair
- Anti-breakage Strenghtening Cream; daily after-care, prevents breakage, split-ends and dryness

More description:
Blend of natural oils, minerals and proteins that strengthen hair.
  • Strength + growth - wheat, oat and soy proteins
  • Restore + rebuild - wheat germ, olive, flax seed and jojoba oils
  • Hi-shine + heat protection - silk amino acids, and avocado, coconut and grape seed oils
According to other reviews, it leaves hair shiny and healthy. I have used it before but I did not appreciate its benefits, I am soo happy to find this in my house. This is what Rochelle (Blackhairgrow.com) uses, having now achieved her 18' long hair.

My hair colour in light?

I was bored on this occasion so I decided to part my hair this way. A backview picture is coming soon so you can see the exact length.

My hairdoll braids..


I'm so happy I finally learned how to braid! Quickly too! Thank you doll! I have been experimenting with different styles.

Family notice

My mum is not aware about my decision to go natural. I'm sure she wouldn't mind. She didn't let me use weave until I was like 14 and I understood her plight. Apparently it makes a girl look older than she is and when a girl shows her natural hair it tends to make her look younger. My mum would probably like my decision, sometimes she wants me to leave my hair out instead of fixing weaves upon weaves. Don't worry, I'm progressing.

External Article: Henna Hair Dye


This is a very healthy way to get red and other reddish color variations, without the damaging effects of synthetic products, providing that you use body art quality  henna, your hair will love you for this because unlike its synthetic counterparts henna will keep your hair soft, shiny, easy to manage and give you gorgeous colors!

Ingredients:
1-cup henna (body art quality)
1-cup lemon/orange juice/grapefruit juice (chamomile tea is also an option)
1/2 cup to 1 cup filtered water (try to avoid chlorinated water)

Method:
In a mixing bowl that you can afford to be stained red, mix henna and lemon juice. Any of the acidic juices listed above can work just as well. Add 1/2-cup water pouring on the mixture until it has a yogurt like consistency. Cover bowl with a plastic wrap and leave for 12 hours.

After 12 hours at 24 C the henna is ready to be used. In preparation you need old towels or rags, protection for the floor around you and also plastic gloves to do the application. Use the same precautions as dying your hair; protect your neck and clothes as far as possible before you begin. Apply a light coat of Vaseline along the hairline and forehead to protect these areas from being stained.

Part your clean and dried hair in four parts. Put on your gloves, your hands will be stained if you do not do this. Apply the henna using your fingers beginning at the hair roots, working your way through the four sections till all the hair is covered. Work henna paste all the way to the ends of the hair for each section.

When all the hair is evenly covered, your hair should be generously coated with henna, pile the hair on top of your head–fasten it with a clip and put on a plastic cap–some persons use a saran wrap, a plastic cap is easier to maneuver if you are doing this alone. Over the plastic cap tie a towel or a bandana over the cap for added heat. This will prevent the henna from drying out too quickly and keep the heat trapped on your head.

For deeper, richer color stay under the plastic cap for a minimum of two hours. The longer the henna is in the hair the deeper and richer the color and the more it will stain your hair. Also, if you go under an overhead dryer for 30 minutes this will hasten the coloring process and does wonders for your final hair color.

Rinse out the henna paste from your hair with room temperature water and conditioner. Do not use shampoo at this stage.

The final, glorious color will be revealed the older the dye stays on your hair.

Please note: For longer hair 2 cups henna to 2 cups lemon/orange.

Courtesy: Black Hair 101

Hair Butters

Hair butters together with coconut oil can be used to make a hair gel. Instead of using the usual seethrough hair gels from the shops, you can make your own using a hair butter.


What are hair butters?
Hair butters are pressed from various nuts, fruits, and plants that have nutrients in them that are good for the hair and skin. Examples of some of these pressed trees and plants are: shea, mango, cocoa, avocado and hemp. For years various cultures in Africa have been using these butters for skin and hair with great results.

Nutrition Benefits
They are easy to absorb in the skin and hair and have the capability of renewing the skin by speeding up skin cell regeneration. They are rich in Vitamin E, the healing vitamin, and hair butters are known to assist in the softening of hair and assisting in hair growth. These natural butters are far better for your skin and hair than any commercially prepared concoction, they are easily absorbed by the body, allows moisture to flow back and forth. Your skin and hair stays clear and moisturized when you use these butters and the best thing about the butters is that they are all natural.

Types of Butters
There are several hair butters on the market that are very useful for black hair. These butters are a great alternative to several beauty and hair products on the market. Some of them are:
  • Shea Butter
  • Mango Butter
  • Avocado Butter
  • Cocoa Butter
  • Hemp Butter
I personally would recommend Shea Butter. You can find these products at your local hair shop, just ask.

Hair Oils

There are so many good and natural oils that can be used to promote the growth and strength of your hair. You can by these essential oils in shops and add them to your hair creams, conditioners and shampoos if you will. Because our hair is tender, we need to put in more effort into caring for it naturally by avoiding the use of harsh chemicals.
  • Olive Oil - Only olive oil that is labelled “extra virgin” guarantees that the oil has been cold pressed from freshly harvested olives and does not contain chemicals. For relaxed/permed hair ladies excessive chemical use can cause hair damage, olive oil contains antioxidants that promotes a healthy hair  and scalp. Olive oil strengthens and smooths hair cuticles.
  • Coconut Oil - Coconut oil consists of more than ninety percent of saturated fats Vitamin-E and Vitamin K and minerals such as Iron. Coconut oil is considered one of the best natural nutrition for hair. t is an excellent conditioner and helps in the re-growth of damaged hair. It also provides the essential proteins required for nourishing damaged hair and it softens the hair and conditions the scalp.
  • Jojoba Oil - Jojoba is a traditional treatment in many cultures for relieving skin problems and promoting hair growth. It is effective in reducing dandruff and for moisturizing very dry skin.
  • Almond Oil - The nutrients in almond oil make it an ideal solution to many hair problems and to maintain healthy hair. The combination of fats and fatty acids in almond oil softens, strengthens and nourishes the hair. Almond oil has been recommended as a hair growth agent for centuries..With the benefits of Vitamin E and potassium, almond oil helps with hair fall out and breakage as a natural hair loss treatment. In the event of dry scalp, almond oil nourishes and moisturizes the scalp, and removes the flakiness.
  • Avocado Oil - It is full of vitamins that your hair needs like vitamins A, E, D and potassium. If you want a super deep conditioner treatment without having to buy a commercial preparation, you can add avocado oil to the other carrier oils and you will definitely feel and see the difference.
  • Peppermint Oil - helps to stimulate blood flow to the root of the hair. This is very important for hair as it helps the hair to receive proper nourishment. This in turn will lead to hair growth. That tingly feeling when peppermint oil is felt on the scalp is actually the stimulation of  blood flow to hair.
  • Vitamin E Oil - Proper circulation leads to thriving hair follicles  which leads to hair growth. Vitamin E contains valuable antioxidants that help to keep the immune system up and improves circulation to all parts of the body, including the scalp. When added to homemade products, Vitamin E extends their shelf life. This oil  offers protection for the scalp and skin.
  • Castor Oil - It nourishes hair and prevents the scalp from drying by retaining moisture. Castor oil added to hair care products helps to seal moisture, softens, and visibly thickens hair. Castor oil can also be used by itself on the hair to seal in moisture. It can be used to grow your eyebrow hair.
Go to your local hair or beauty store and ask for any of these oils. They work wonders!
More information